Greeting friends, a question often asked, ‘what is a good quiver to use’, or, ‘how can you make one’? As with anything this can be a very big subject, but let’s go into some basics of not only construction, but of some of the use cases related to quivers as well.
How many bolts do you have? What kind? In this case the head/APD type is more important. There are several shaft types. So when it comes to choosing the quiver to use and construction methods, it will partially depend on your ammo. If you have a sewing machine (and know how to use it) this will be fairly easy regardless of your method. I hand-stitched mine where necessary and used other simple means of assembly such as glue, and simply running1/4″ leather straps through punched holes. Crude but effective.
Your construction methods may also depend on the type of combatant you are. Are you explosive, running around dodging and weaving? Are you stationary like a turret and meticulously picking off the opposing teams? The type of archer you are can also dictate the type of ammo you use, but that’s another post.
One need not use canvas, but use a material that is sturdy. Canvas and leather are great, but anything you have available or easily attainable should work. If all else fails, literally use a pillowcase (in your heraldic colors of course ;p). Material should be able to stand up to stepping, dragging, storing, and general wear and tear.
Bolts – Baldar and fiberglass:
Many people love the Harbor Freight canvas bags (fig.1). With a slight modification they can be used right out of the shipping box. Grab a few carabiner clips and some rope or tape. or grommets if you have them.
You can remove the handles so they are not in your way, or remove one and use the other as an attachment point. Or remove both handles, then you can punch holes just under the ring (optionally grommet) then run loops, or carabiners (fig.4).
Keep in mind the tubes will accept the bolts or arrows either end: APD, or Baldar. but the UMHW or padded heads.
Arrows – Baldar, UMHW, or Siloflex
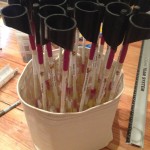
Due to the larger size and bulk of these, something the size of the Harbor Freight bags work great. However they are too short. I have seen everything from pillow case style loose bags with a belt loop, to cutting a HF bag in half horizontally and inserting 12-16″ of fabric, canvas, etc (fig.2). For arrows I recommend making several quivers and not ‘over-crowding’ them. The bags are deep enough one needn’t worry about ammo spilling everywhere. Organization is less important. By not over-crowding, you will spend less time ‘untangling’ ammo as it comes out of the quiver.
If you wish to use the tubes for organization, you only need about 4″ at the bottom to put the ends into.
Make a hip and a back quiver? This greatly depends on your context, perhaps you sling a quiver over your back so you don’t have to go far away to reload. If you have a ‘pillow case’ quiver with a generous strap, this can be easily done. A good reason to have an optional strap with length is for flexibility.
General tips:
Make a few quivers! Either to share or make reloading easier. Also during the construction process you may find better ways of achieving the same goals. Plan your project!
I would really suggest carabiners as attach points (fig.4). Easy to take on and off. And if you have several quivers, and need to reload at a larger battle, you can do it quickly.
Leg straps work really well (fig.4). Aside from belt attach points, have a strap, leather cording or similar that attaches at the bottom of the bolt quiver and ties loosely around your leg to keep the quiver vertical. For arrows this is less important, but one could add an attach point midway so it ties around the thigh. If you run around a lot, this keeps the ammo from falling out
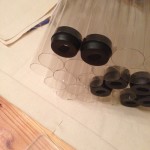
If using tubes (fig.3), you can attach them several ways or not at all. In my personal quiver they started off glued but separated over time. They all fit so snugly however that they don’t need to be glued, the tension of the bag holds them in place. There are several option for keeping them together.
- Fill the quiver with tubes, retain the shape and lift them out, then run duct tape around the outside
- Staple them together
- Apply glue in the voids between the tubes while in bag
- Apply glue to the bottom of the bag, then lower the tubes into place
If you are using a bag with no shape, you can use a plastic Ikea cutting board (or similar) (fig.5) that you trim into the shape of your quiver, and stitch, glue, or simply put into place.
Reference Links:
Canvas Bags
Tubes for Baldar arrow or bolt
Tube guards in colors!
purple, red, green, light blue, blue, yellow, amber, canary, pink
Additional photos by Jonathan Lockwood