Insulate yourself from hassle – Making Target Backs

Greeting friends!

When it comes to making target backs, it can get complicated real fast, and there is a lot of good advice to be gleaned.

One quick and dirty way Ive discovered and worked on and it is dead simple to create, and deploy.

Use the pink insulation board you can get at any home improvement store. Cardboard you can get anywhere but you can also purchase these. The pink boards come in various shapes and sizes, so depending on your target size, you can get what you need. you can use a pocket knife to cut the boards. I don’t recommend trying to use the ‘score-and-break’ method you might use on drywall.

I like to get my targets printed out at the local print shop (Minuteman Press). They can print on thicker paper stock up to fairly large sizes, but the most cost effective are 11×17, and they usually refer to it as ‘card stock’.

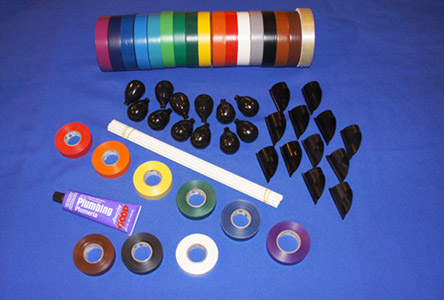
Next you will need some adhesive. I recommend 3M Super 77 Spray Adhesive.

target_layers
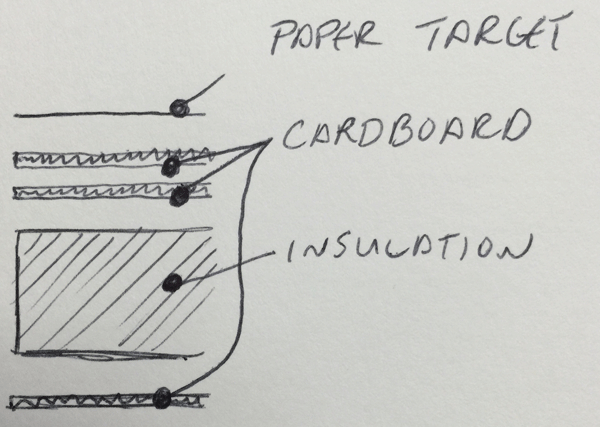
Like ogres, these targets have layers. Sandwich the cardboard and the insulation using the adhesive. Spray the adhesive on both faces, wait 45 seconds, then laminate them (press together). I usually try to have two layers of cardboard on the side that gets penetrated. You can then apply the thick stock paper printed target on top.

Assembly can go pretty fast. Make sure you are in a well ventilated area. Use gloves if you can, because this stuff is pretty nasty if you get it on your hands. That said, I don’t usually use gloves, I’m just careful.

These targets will stand up for years of regular use, and the cardboard laminate helps keep them together. Especially in cold environments where the insulation may be more brittle.

When you have new faces printed up, you can spray a little adhesive, and reapply right over the top. Add a new layer of cardboard to keep the face fresh, or strip off the old and re-apply the new. In this way the targets become more modular.

target_placement
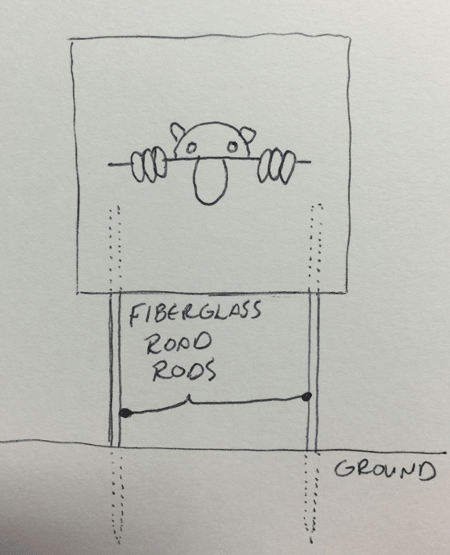
How do we stand them up? In the area where you find mailboxes and ‘For Sale’ signs, you can find Fiberglass Rods
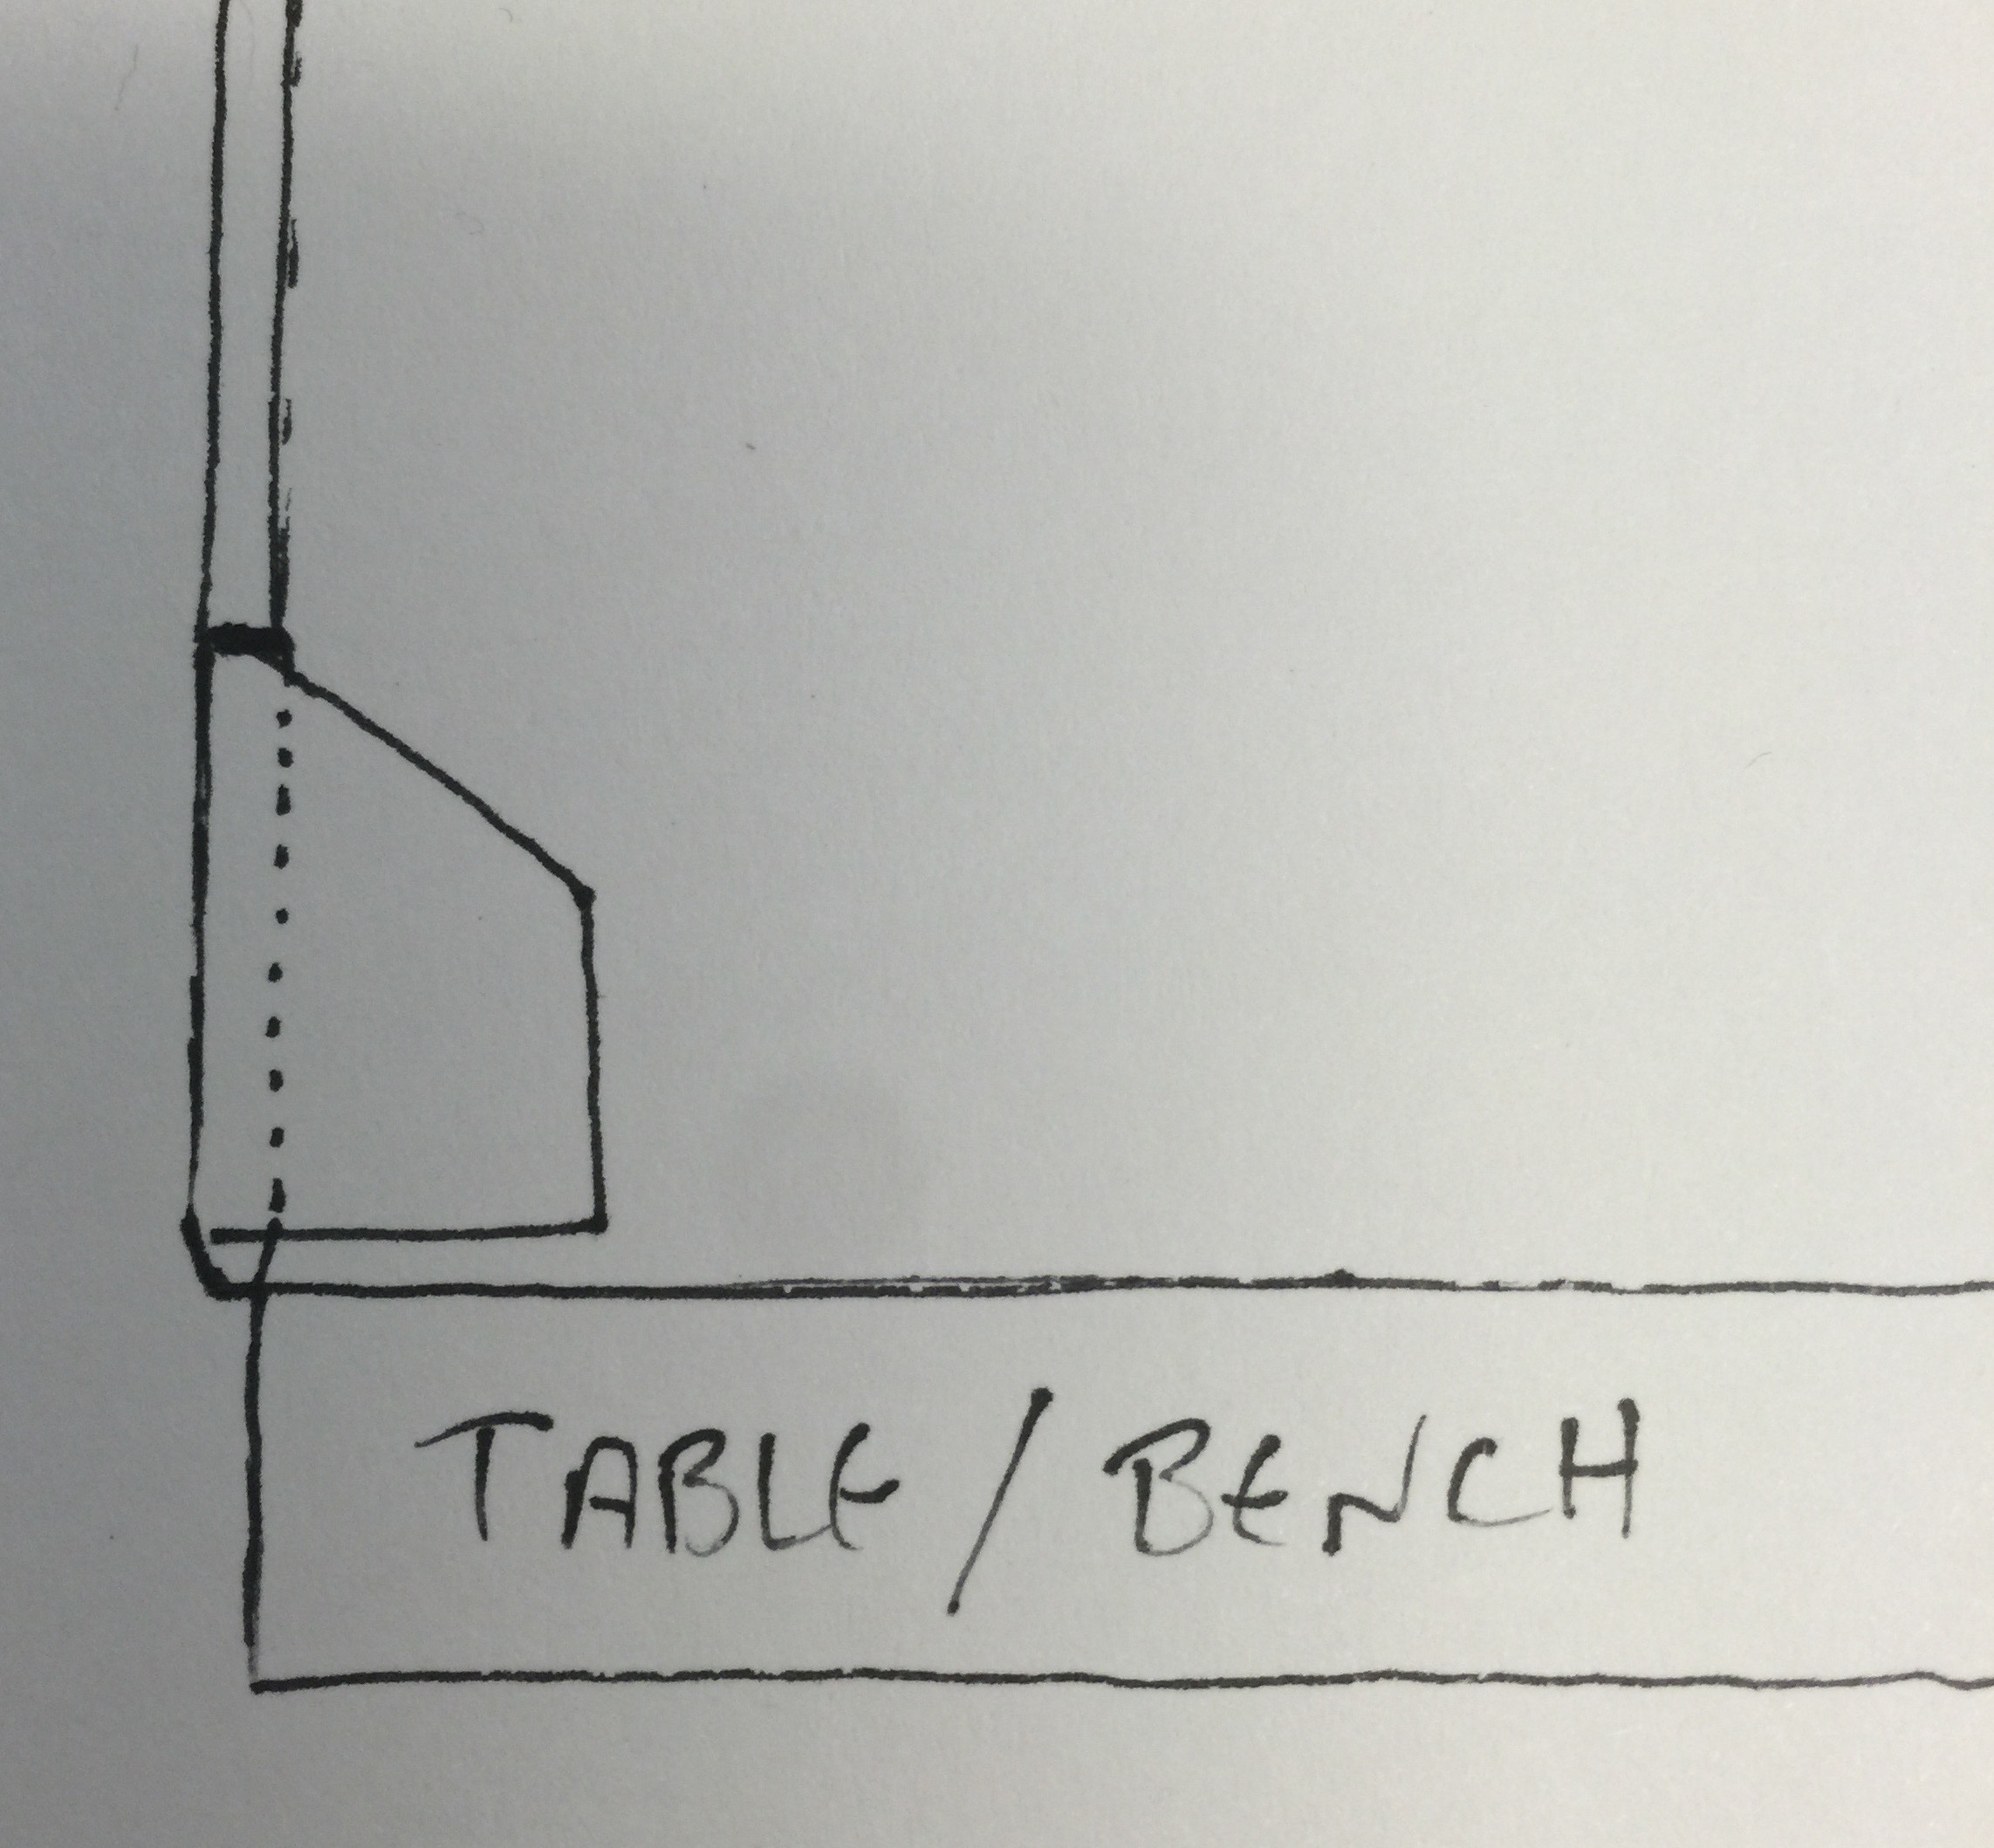
. You can easily cut them down to usable sizes. for smaller 6×6″ targets, you will only need 8-12″ rods, for something like 2×2′ I would use two full length rods. The most important thing is to always erect targets with a  pair of rods. This prevents spinning and helps keep the target in place. I try to work in thirds: On third in target, one showing, one in ground. OR you can press the target all the way down so it ‘sits’ on the ground, this method offers more stability, less ‘wobble’. You can usually force the rod into the insulation without much resistance.

Try to make sure you are parallel so the rod doesn’t protrude out the front or back. This will create a weak point that will shorten the life of the target.

There are other methods of quick and dirty backing, like plastic bags gull of plastic bags, spray foam, but perhaps we can go into that later!

Caveat for using these kinds of targets: Some ammo on entry, will heat this plastic up, and melt to the shaft. You can literally peel it off, but be aware. The more cardboard you use, I find, the more it mitigates this issue. YMMV but my crossbow is #76 and my recurve is #44. Don’t spray the adhesive too thick, you just need enough for adhesion. Too much and it will ‘gunk’ up your shafts as well.

Making Combat Bolts – Fiberglass Baldars

Recently talked someone through making some bolts and I thought it would be helpful to have some visual references with a step by step guide.

A kit as sold by Northstar Archery

Lets assume you have the pieces all purchased.

Got all your bits? Lets go!

Lets start with your shafts. Grab a blunt, you dont have to, but I like to smear just a touch of glue on the tip of the shaft. If you do this make sure to not over do it! Literally a smeared touch of glue. Place the blunt on the shaft and use the hammer to tap it down. You can flip the shaft and hammer the end of the rod but you may damage the rod and make it harder to seat the APD later. The blunt should seat 1 1/8″ down the shaft.

Once the blunt is securely in place, grab an APD. You should see a small pinhole on the APD near where the shaft goes in. This is where the excess glue can bleed out. Grab a pin and poke that hole to make sure it goes through and it clear of obstruction. This time, take a small pea-sized amount of blue and drip it in the APD hole. Insert the shaft in the APD. Now on the edge of a table or workbench, with the blunt on top and APD on bottom,

Illus. 1
Illus. 1

place the ring of the APD on the surface. The little nub at the bottom of the bold will be the only part hanging off. Hammer on the blunt to properly seat the APD. You may see a little glue squirt out the hole.

Next we will need the 1″ fiberglass tape. you want a piece that will go  from end to end of the complete fiberglass shaft. This tape wraps around the shaft just. The whole shaft must be covered so that no fiberglass is showing.

Next comes the wrapping of the APD and Blunt. If you have 1/4″ tape, use this, otherwise you can split a strip of 1″ into 2-4 vertical strips. You may lose a piece or two in the process as well as cut a few too short. You will get the hang of it.

Illus. 2
Illus. 2

On the Blunt, make an ‘X’ and let the tape go down on the shaft at least an inch. For the APD, refer to Illus. 2 and make an ‘X’ from the shaft to the APD tip, then flip bolt over and go straight down the APD to the shaft. The APD tape isn’t a requirement, but its a good thing to do! This can be done with electrical tape, but using strap tape will last a LOT longer and is that much safer.

Now we need to have pretty bolts right? Here is where

Illus. 3
Illus. 3

the electrical tape comes in.  You can at this point cover the blunt tape with colored electrical tape of choice to make it look nicer if you opted for strapping tape previously. Refer to Illus. 2 and note where the strap tape ends. Now we want to to start wrapping with electrical tape about a half inch above where the Blunt/APD ends, then wrap up/down until the strapping tape is covered. (Dont use too much gold tape! This is reserved!) Decorate to your content but remember the more tape, the thicker the bolt. Make sure the crossbow channel can handle it. Make sure you leave some space for…

Time for the label! I like to make a label in something like photoshop, but you can use Gimp, a label maker, whatever! Print out labels about 3/4″ x 1.5″. Make sure to include your SCA Name, Barony, Kingdom. Make sure its a legible font that can be read after being stepped on a few times. This covers all the bases. Now take your clear packing tape and go at least one and a half times around over the label.

Thats about it! Please post questions or comments in the comments below!

Next up, I’m all a quiver!

Additional Notes:

Bring extra tape and labels with you. You may get short on bolts and will need to do some last minute repairs.

If going to a war, I’d recommend at least 50 bolts because there may be a few battles before bolts get gleaned and re-inspected.

Ill shoot all my bolts at a board from about 20 yards. This is good target practice but also ensure the heads are seated.

Measure the shafts, if a few are longer, then the APD or Blunt may not be seated all the way!

Resources:

Northstar Archery Kits

Argent Plus


Your version may vary due to Kingdom law, please check yours before making any purchases or assembling. But as of time of writing, these are legal for Pennsic and most Kingdoms

New to Archery? Read this before you jump in too far!

New to archery? If you live in Atlantia, you happen to be in a premiere kingdom for the sport. From Atlantia to An Tir though, you cant swing a herald without hitting a good archer. Having helped a few beginners, I thought Id write a brief primer for reference. Not meant to be exhaustive, or official, just some things I think may be helpful.


Show up at archery events:
Come to events or simple gatherings, and let people know you are coming!
Often times if people know you’re coming, they’ll bring loaner equipment. First person experience is always the best way to go.

Whats coming up:
You can consult your Kingdom or Barony site (ie: The Acorn http://acorn.atlantia.sca.org/) Most all
Kingdom or Barony sites or related resouces (Facebook pages) will have a list of events and or practices.

Coming to an event shoot:
Seek out the marshal running the line, introduce yourself, and let them know you are new. Most archery events I’ve been to have some loaner equipment, if no equipment is available, perhaps someone shooting does. The marshal may know who to talk to on your behalf, or at least know where to point you.

Rules and regs:
Always pay heed to the marshal, or anyone calling “Hold!” If there is a hold, stop shooting, unload your bow safely. The marshal will let you know when you may approach the line and shoot. Whether physical or not, there is a line. When safe to do so, straddle the line, and shoot as directed. When you are finished (usually 6 bolts, darts, or arrows), then step back about 10 feet. This is not only an issue of safety, but of courtesy: if people are waiting to shoot, this is a clear indication they can fill in and have fun too! Back to the hold thing, if you see a person doing something dangerous, you (yes you) can call ‘hold’! Safety is everyones responsibility!

Looking for a bow:
This is where it gets personal. I encourage you to use as many bows as you can, but nothing really beats getting a bow, and using it regularly. Start off light, around the 20#-25# area for recurves, handbows, less than 600 inch lbs for a crossbow. One very good reason for the lighter poundage for crossbows is you can use it for combat archery should you go that route. For bows, the same applies, but there are more factors involved shooting a bow. Anchoring, draw, release, and so many other tiny little things. This will all be MUCH easier to work on if you are drawing a 20# bow than a 80# Kodiak. The best part is, form translates from bow to bow (pretty much).

Arrows:
This is pretty personal as well. Since I believe you should start light, go ahead and buy some arrows spined for 30# (pounds)** at 28-30″ long (after using some loaner equipment to see if you’re having any fun at all!).
I know Ill get some disagreement here, but this way you are using your own ammo for shooting, so if anything gets lost or broken, you wont feel guilty (go ahead and lose my loaner stuff, Ill get more!).
My recommendation for beginner arrows: Get wood shafts, 100 grain field points, simple indexed plastic nocks, and feather fletching. Dont go fancy until you have a bow and start to know what it really is you’re going for. I recommend No Frontiers Archery (Eric Franqes)*, for both price and quality.
Be prepared to lose ammo, and have shafts break, etc. Youll hear it 100 times, “Dont fall in love with your ammo!”

OMG help me!
There are plenty of people that will work with you if you are polite, and you ask. Many archers on the line are extremely knowledgable, and proficient. Don’t let anyone tell you 100 things at once. Not only will you get bogged down with the details. You may quickly find you’re not having fun, but stressing over little things! It will come with time and practice, Robin Hood will have nothing on you in a year! I think most important is, be consistent! If you are consistent, you may miss, but you’ll miss in the same spot!

Have fun!
Archers are generally a little brain damaged and fun to hang out with. Dont let yourself take the sport too seriously. Skill comes with time and practice, just go out, be safe, and shoot, and shoot, and shoot, and shoot!

Will I shut up?!
Not likely. I could go on and on. I love to hear myself talk, but Ill leave you to it now. Go out and enjoy your self.

Have some advice to share?
Great, add to the comments and if you have a vendor to add to the list contact me via the contact the mayor form in the left rail!


Reference:
Society Marshals Handbook
An Tir Book of TargetAtlantia Archery Handbook

Vendors:
No Frontiers Archery
Janyn Fletcher


*not endorsed or affiliated with any vendor
** this will depend on the bow and assumes a 20-30# bow