Greeting friends!
When it comes to making target backs, it can get complicated real fast, and there is a lot of good advice to be gleaned.
One quick and dirty way Ive discovered and worked on and it is dead simple to create, and deploy.
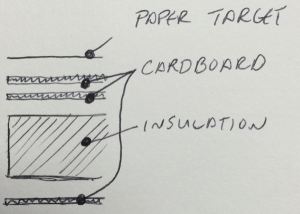
Use the pink insulation board you can get at any home improvement store. Cardboard you can get anywhere but you can also purchase these. The pink boards come in various shapes and sizes, so depending on your target size, you can get what you need. you can use a pocket knife to cut the boards. I don’t recommend trying to use the ‘score-and-break’ method you might use on drywall.
I like to get my targets printed out at the local print shop (Minuteman Press). They can print on thicker paper stock up to fairly large sizes, but the most cost effective are 11×17, and they usually refer to it as ‘card stock’.
Next you will need some adhesive. I recommend 3M Super 77 Spray Adhesive.
 Like ogres, these targets have layers. Sandwich the cardboard and the insulation using the adhesive. Spray the adhesive on both faces, wait 45 seconds, then laminate them (press together). I usually try to have two layers of cardboard on the side that gets penetrated. You can then apply the thick stock paper printed target on top.
Assembly can go pretty fast. Make sure you are in a well ventilated area. Use gloves if you can, because this stuff is pretty nasty if you get it on your hands. That said, I don’t usually use gloves, I’m just careful.
These targets will stand up for years of regular use, and the cardboard laminate helps keep them together. Especially in cold environments where the insulation may be more brittle.
When you have new faces printed up, you can spray a little adhesive, and reapply right over the top. Add a new layer of cardboard to keep the face fresh, or strip off the old and re-apply the new. In this way the targets become more modular.
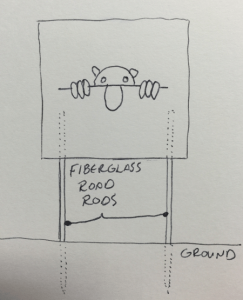
 How do we stand them up? In the area where you find mailboxes and ‘For Sale’ signs, you can find Fiberglass Rods
. You can easily cut them down to usable sizes. for smaller 6×6″ targets, you will only need 8-12″ rods, for something like 2×2′ I would use two full length rods. The most important thing is to always erect targets with a pair of rods. This prevents spinning and helps keep the target in place. I try to work in thirds: On third in target, one showing, one in ground. OR you can press the target all the way down so it ‘sits’ on the ground, this method offers more stability, less ‘wobble’. You can usually force the rod into the insulation without much resistance.
Try to make sure you are parallel so the rod doesn’t protrude out the front or back. This will create a weak point that will shorten the life of the target.
There are other methods of quick and dirty backing, like plastic bags gull of plastic bags, spray foam, but perhaps we can go into that later!
Caveat for using these kinds of targets: Some ammo on entry, will heat this plastic up, and melt to the shaft. You can literally peel it off, but be aware. The more cardboard you use, I find, the more it mitigates this issue. YMMV but my crossbow is #76 and my recurve is #44. Don’t spray the adhesive too thick, you just need enough for adhesion. Too much and it will ‘gunk’ up your shafts as well.