Reach Out and Touch Someone – Pole Arm Construction

As a combat archer, there are times when there simply isn’t any combat archery, or there are alternating scenarios, whatever the case may be… So I thought to myself, ‘Self, you should take up pole arm!’

Im no stranger to rattan having made made throwing daggers, and other things out of it. So I sought the help of the community and got some great assistance from Vlad Iliescu, and John Hutchings. Vlad was kind enough to send me some videos, I won’t repost without permission, but I will document what resulted from the assist!

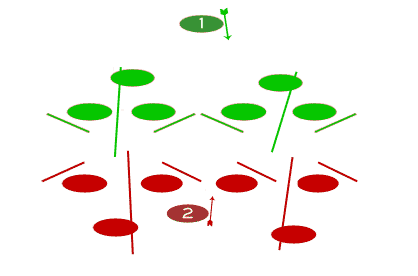
Using the image below as a reference…

Materials Used:

  • 12′ rattan or lengths fit to use
  • fiberglass strapping tape
  • duct tape (colors of choice)
  • leather cording
  • cell foam (the kind used for padding armor or similar)
  • saw or other method for cutting rattan
  • sander, planer or other method for shaving rattan
Step by step construction of a polearm for use in SCA armored combat

Let’s dive in!

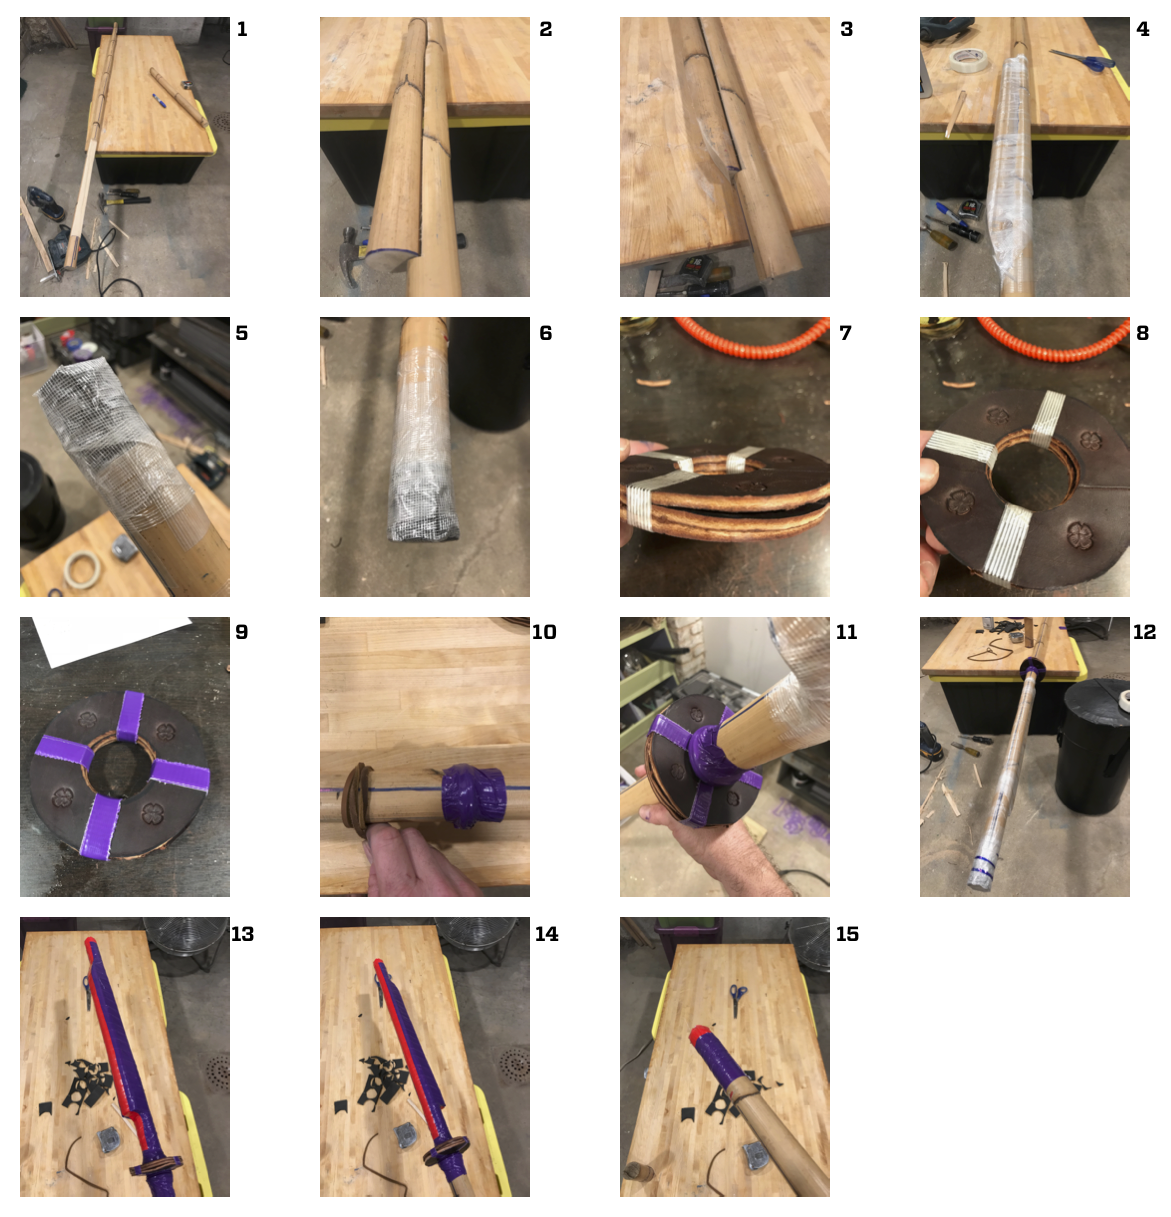
Cut the total length yo your Kingdom maximum length, take away 6″ which we will make up later. The remaining piece cut to 18″ (or to suit, see below).

  1. Cut a notch about 1/3 total diameter depth as long as you like for the blade length. Make sure to leave enough for strength. In this case as I recall the length was about 18 (as noted above).
  2. Fit the additional piece in place. The tighter the fit, the better.
  3. Notice the grading on the top part of the laminated piece. This helps decrease the sharp edging as looking more like a period weapon.
  4. I tend to overdo this part. Ya know, safety… Wrap it up and down with (fiberglass strapping) tape. Pay extra attention to the joined ends and ensure a tight, secure taping job.
  5. Now for the thrusting tips. Check your Kingdom rules, but mine are a full 3″ of padding. I start by cutting a series of discs that are the same diameter as the pole. Stack them up. You can additionally create two long strips about 1″ wide and about 8-10″ long, cross them over the end. After assembly side wrap top to overlap onto the pole by at least 3″. Cross tape over the top. Side wrap again even deeper down the shaft.
  6. Repeat for the other end.
  7. Now for the rondel. You can employ several methods for this part, in my case I used leather. Using 3/16″ leather I cut three discs, and center punched to as tightly fit the shaft as possible.
  8. Laminate the pieces together using strapping tape. Use as much as you like to make it safe and ensure it stays together.
  9. In my case I used purple duct tape to mask the ugly fiber tape.
  10. Here I use leather cording (stripped from the same leather used in rondel). these are about 12″ long. One small piece of tape to hold one end down. Tightly wrap and secure with tape.
  11. Place rondel and then repeat step 10 on the other side to secure the rondel in place.
  12. Here I tape the shaft all up to ensure its all as secure as possible. Continuous taping ensures strength. Many little piece can fail more easily.
  13. Taping with my base colors to make it puurrrty.
  14. More puurrrrty and adding red tape for the striking edges.
  15. Red for the thrusting points
  16. (Not pictured) I used a sander and planer for indexing the handle. This is so that no matter what I know which way my blade is facing.

Thats about it folks, not much to this. In my case I needed a few friends to help me get started. Access to tools always helps. Lean on your community for tools, advice, space, whatever you need.

Happy Hunting!

Working on the front line – Communication is key

There you are on the front line and you hear a [KA-CHUNK] right by your ear hole. What you didn’t know is that there is an archer right above your shoulder taking opponents out.

Let them know you're there! Support tactics and communication
Let them know you’re there! Support tactics and communication

Communication is key for several reasons. After a recent event where we ran through exercises and discussed tactics, one thing was very clearly important: communication.

This can be as simple as alerting the line you are advancing up. The trifecta of death IMO is 1,2,3 (1 being the front): Shield (sword and board), Polearm, and Archer. But in this case the Polearm and Archer can be interchangeable. Lets go with the One-Two punch. Shield and Archer.

As you advance to the line let your shield/line know you’re there. They have one job and that is to stay alive, but if they know you’re there they can try to keep you alive as well. Deflecting opponent archers and poles.

Additionally if there happens to be an opponent on the line that is particularly hard to deal with, such as a Knight, Commander, or Crown, they can call out, and thereby give you leave to take them out.

A big part of teamwork is knowing what assets are in play and how to best utilize them. If your team knows an archer is there to help it can make their job easier. Just as when a shield dies, and ‘fill in!’ is called.

We all have our jobs: communicate effectively, and thereby win.

CA Tactics – Tips From The Front Row

If you are like me, a combat archer who loves to be in the thick of it, then take a second and let me share what Ive learned in these few years.

The intention is to show the differences in CA tactics and provide some tips. More focus on front line engagement (R2)

fig. 1
fig. 1

Let’s go over some situations that present themselves here. We have green and red team. Please note that the G1 is hanging back, while R2 is behind the shield line.

Defense

The benefit of being in the front line here is clear. You get to stand behind someone who can actively help protect you. Though their first priority is usually to protect themselves and hold the line, they can help you as well.

Once R2 moves up to this position, communicate. Let the shield line know you are there. They can actively call enemy missiles as well as deflect. Once there, when you reload, keep your eyes on the field, and duck down. This will allow you to reload safely and not get plucked off by opponent archers or poles.

G1 does not enjoy the benefit of cover. Though you have distance on your side, you may think some bolts or arrows may not reach you, but you are ripe for the picking. The opposition will still see and fear your missiles however. sometimes you don’t have a clear shot, stay locked and loaded and pointed at the foe, you will keep their heads down and still help the team. If the opponent line make a push you wont get trampled but your shots are not as effective as in the rush, an opponent may not even register your hit. It may be a good idea to wait until the line settles a little, then pluck off any remaining opponents.

Offense

Call your shots and let your team know you are there! It never hurts to tell your team you are firing. Not only does it assist your team, but the opposition will also hear this and get distracted because the archer may be pointing an arrow at their face. Additionally, if your line is having a hard time with a specific person, they may want you to take them out. Always identify your warlords and battle hardened friends, they know who the key opponents are.

R1, listen to your team. If a polearm wants to step in to fill the line, take a step back and play a more support role. Polearms are very effective at keeping the shield line back with a constant threat whereas with CAs there are the reload down times to contend with.

If you are G1, work with another archer if possible. Alternate fire so you are not caught unloaded by a stray opponent.

Also keep a thrown weapon on you. A dagger will fit nicely into your quiver or belt and can be used again and again if once you’ve shot, you are getting rushed by a ‘heavy’.

And when on the front line, take your time, and make every shot count. If you go ‘Machine Gun Kelly’ and have a 30% kill ratio, you’ll then have to reload more often and disrupt the lines. Keeping your bow leveled on the enemy keeps their heads down and distracted. Let the poles take them out as well!

Please comment with thoughts or additions!