If you are like me, a combat archer who loves to be in the thick of it, then take a second and let me share what Ive learned in these few years.
The intention is to show the differences in CA tactics and provide some tips. More focus on front line engagement (R2)
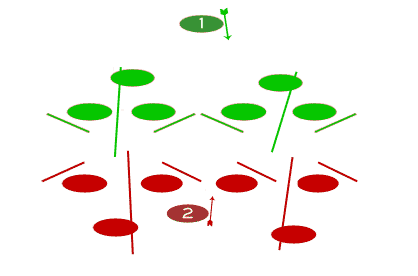
Let’s go over some situations that present themselves here. We have green and red team. Please note that the G1 is hanging back, while R2 is behind the shield line.
Defense
The benefit of being in the front line here is clear. You get to stand behind someone who can actively help protect you. Though their first priority is usually to protect themselves and hold the line, they can help you as well.
Once R2 moves up to this position, communicate. Let the shield line know you are there. They can actively call enemy missiles as well as deflect. Once there, when you reload, keep your eyes on the field, and duck down. This will allow you to reload safely and not get plucked off by opponent archers or poles.
G1 does not enjoy the benefit of cover. Though you have distance on your side, you may think some bolts or arrows may not reach you, but you are ripe for the picking. The opposition will still see and fear your missiles however. sometimes you don’t have a clear shot, stay locked and loaded and pointed at the foe, you will keep their heads down and still help the team. If the opponent line make a push you wont get trampled but your shots are not as effective as in the rush, an opponent may not even register your hit. It may be a good idea to wait until the line settles a little, then pluck off any remaining opponents.
Offense
Call your shots and let your team know you are there! It never hurts to tell your team you are firing. Not only does it assist your team, but the opposition will also hear this and get distracted because the archer may be pointing an arrow at their face. Additionally, if your line is having a hard time with a specific person, they may want you to take them out. Always identify your warlords and battle hardened friends, they know who the key opponents are.
R1, listen to your team. If a polearm wants to step in to fill the line, take a step back and play a more support role. Polearms are very effective at keeping the shield line back with a constant threat whereas with CAs there are the reload down times to contend with.
If you are G1, work with another archer if possible. Alternate fire so you are not caught unloaded by a stray opponent.
Also keep a thrown weapon on you. A dagger will fit nicely into your quiver or belt and can be used again and again if once you’ve shot, you are getting rushed by a ‘heavy’.
And when on the front line, take your time, and make every shot count. If you go ‘Machine Gun Kelly’ and have a 30% kill ratio, you’ll then have to reload more often and disrupt the lines. Keeping your bow leveled on the enemy keeps their heads down and distracted. Let the poles take them out as well!
Please comment with thoughts or additions!
I greatly agree that getting right up there and working WITH the rest of your Army is the most effective (and fun!) way to do CA in most scenarios.