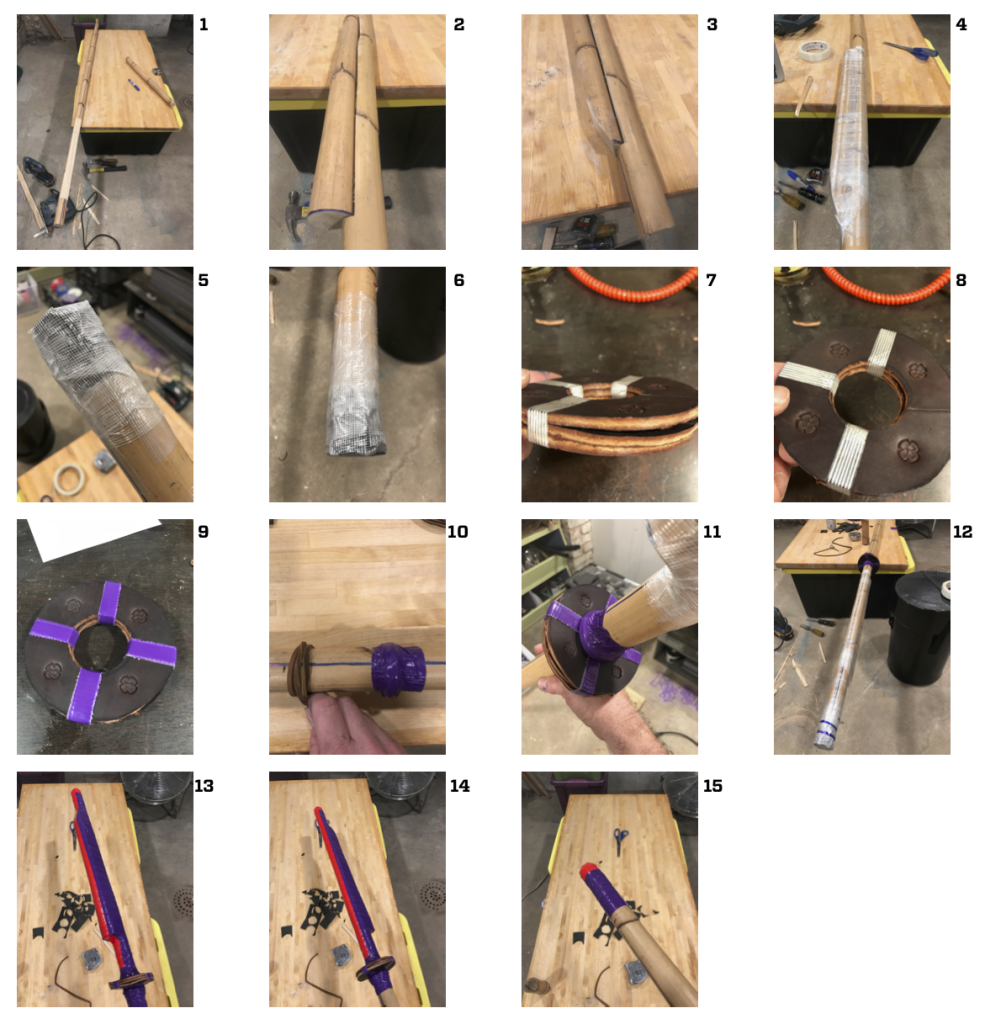
As a combat archer, there are times when there simply isn’t any combat archery, or there are alternating scenarios, whatever the case may be… So I thought to myself, ‘Self, you should take up pole arm!’
Im no stranger to rattan having made made throwing daggers, and other things out of it. So I sought the help of the community and got some great assistance from Vlad Iliescu, and John Hutchings. Vlad was kind enough to send me some videos, I won’t repost without permission, but I will document what resulted from the assist!
Using the image below as a reference…
Materials Used:
- 12′ rattan or lengths fit to use
- fiberglass strapping tape
- duct tape (colors of choice)
- leather cording
- cell foam (the kind used for padding armor or similar)
- saw or other method for cutting rattan
- sander, planer or other method for shaving rattan

Let’s dive in!
Cut the total length yo your Kingdom maximum length, take away 6″ which we will make up later. The remaining piece cut to 18″ (or to suit, see below).
- Cut a notch about 1/3 total diameter depth as long as you like for the blade length. Make sure to leave enough for strength. In this case as I recall the length was about 18 (as noted above).
- Fit the additional piece in place. The tighter the fit, the better.
- Notice the grading on the top part of the laminated piece. This helps decrease the sharp edging as looking more like a period weapon.
- I tend to overdo this part. Ya know, safety… Wrap it up and down with (fiberglass strapping) tape. Pay extra attention to the joined ends and ensure a tight, secure taping job.
- Now for the thrusting tips. Check your Kingdom rules, but mine are a full 3″ of padding. I start by cutting a series of discs that are the same diameter as the pole. Stack them up. You can additionally create two long strips about 1″ wide and about 8-10″ long, cross them over the end. After assembly side wrap top to overlap onto the pole by at least 3″. Cross tape over the top. Side wrap again even deeper down the shaft.
- Repeat for the other end.
- Now for the rondel. You can employ several methods for this part, in my case I used leather. Using 3/16″ leather I cut three discs, and center punched to as tightly fit the shaft as possible.
- Laminate the pieces together using strapping tape. Use as much as you like to make it safe and ensure it stays together.
- In my case I used purple duct tape to mask the ugly fiber tape.
- Here I use leather cording (stripped from the same leather used in rondel). these are about 12″ long. One small piece of tape to hold one end down. Tightly wrap and secure with tape.
- Place rondel and then repeat step 10 on the other side to secure the rondel in place.
- Here I tape the shaft all up to ensure its all as secure as possible. Continuous taping ensures strength. Many little piece can fail more easily.
- Taping with my base colors to make it puurrrty.
- More puurrrrty and adding red tape for the striking edges.
- Red for the thrusting points
- (Not pictured) I used a sander and planer for indexing the handle. This is so that no matter what I know which way my blade is facing.
Thats about it folks, not much to this. In my case I needed a few friends to help me get started. Access to tools always helps. Lean on your community for tools, advice, space, whatever you need.
Happy Hunting!